2.21.2019

How to Send Text Message Instead of iMessage on iPhone (iOS 12 supported)


SMS text messages are pretty standard on all phones, so it's the best way to communicate with people who use all kinds of service or operating system. iMessage, on the other hand, is proprietary and specific to Apple. This means that not everyone can communicate with you if you insist on using it because not everyone is part of the Apple ecosystem. How do you send texts instead of iMessages on your iPhone, though? Let's take a look at a few different methods that allow you to easily do this:
Can you relate to this scenario? Many iPhone users do, and it is not funny when you lose that precious information you put down in your Notes. Nevertheless, there are things you can do to fix the problem of your notes getting deleted randomly by your iPhone. We will look at some solutions, but let us find out what causes iPhone to delete notes randomly first.


1 Change iMessages to Text Messages by Pressing iMessages

You can do this by long-pressing the iMessages:
1. When you are done creating your message, you can send it off as you normally do.
2. Long-press and keep your finger on the body of the message (kind of like you do when you are playing with the copy and paste function).
3. A little dialog box will come up giving you a couple of options. One of those should be "Send as Text Message". Tap that, and your iMessage will be turned into a text message.
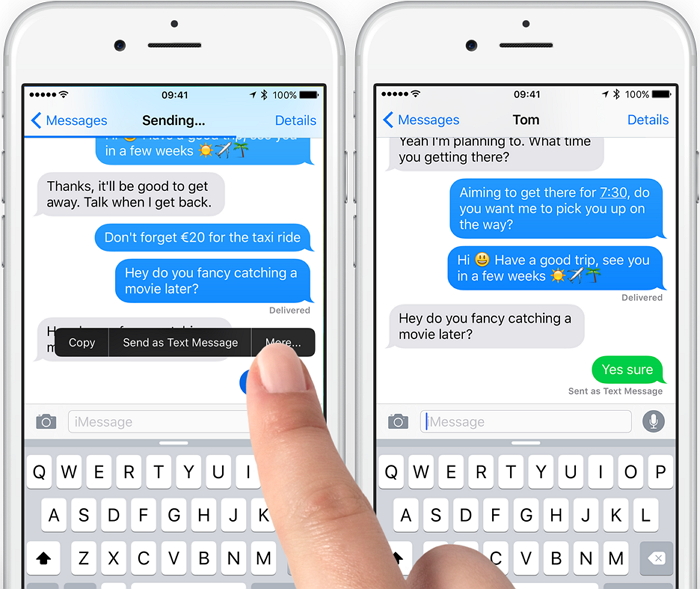
change iMessages to text message
For this to work, you must press it quickly after you tapping the Send button, before the iMessage has arrived to its recipient.Gihosoft Free iPhone Data Recovery:iphonerecovery.com


2 Turn Off Your Wi-Fi and Cellular Data

Follow these steps to turn these off:
  • Go to Settings and go into the Wi-Fi/WLAN section.
  • Turn the Wi-Fi/WLAN off with the switch.
  • Go back to the main Settings screen, and tap Cellular.
  • Tap the switch to turn your data off.
turn off Wi-Fi
You can now text your recipient. Since data and Wi-Fi are turned off, your phone will default to standard SMS texts.


3 Turn Off iMessage on iPhone

You can also simply turn off iMessage. Do this by following these steps:
  • Go to Settings on your iPhone.
  • Tap Messages.
  • Change the iMessage switch to OFF.
turn off iMessage on iPhone
You can also optionally turn off MMS messages if you don't want to send larger multimedia texts, such as texts that have attachments or that are very long.


The Importance of Backing Up Your Messages Sponsor ads:

Gihosoft Free iPhone Data Recovery:iphonerecovery.com
Free iPhone Data Recovery Software for Windows/Mac
Recover up to 12+ types of files, including contacts, SMS, photos, WhatsApp, Viber, notes, etc.
Restore lost data from iOS devices directly or from iTunes and iCloud backup
Recover iPhone data lost due to iOS upgrade/jailbreak, accidental deletion, device lost or broken
Support all the latest iPhone, iPad and iPod Touch
Both Free and Pro version.
If you lost data after you updated to a new iPhone, you can always use Gihosoft iPhone Data Recovery to get the data back from the old iPhone or backup.
Worth reading:download youtube 1080p
If you use android phones, please choose Gihosoft Android Data Recovery
Jihosoft Android Data Recovery: the best Android Data Recovery software for Windows and Mac to recover deleted contacts, messages, photos, videos, WhatsApp and etc from Android

2.20.2019

Review of Wondershare SafeEraser – Why You Should Not Use Any Other Data Eraser 2019


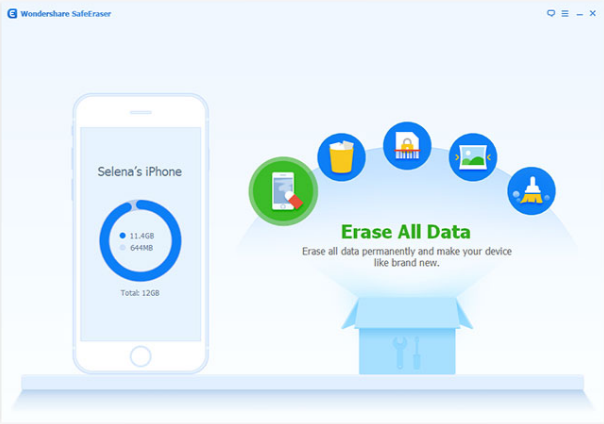
There are many data erasers in the market today and each claim they are the best. However, after a careful study, i have put up this piece to give you an honest review of Wondershare Safeeraser – a leading data eraser in the market.

To begin with, what exactly is Wondershare SafeEraser? This software provides users an opportunity to safeguard their personal and sensitive information by erasing files permanently. Wondershare SafeEraser is also used for clearing browsing history and caches. The chances of anyone gaining access to personal information on iOS devices like iPhone, iPad, etc. are remote when the software is used. That said, let us look at pros and cons of this software.


Pros
1 Delete Efficiently and Permanently

In order to be sure that the claims of the maker of this software are genuine, I had to test out the software myself. First, I tried the free version to see how it works. Without fear of contradiction, I can confidently say it did just what the manufacturer said about it – permanently delete iPhone data without a chance of recovery.
2 Selectively Delete File

I also found out that the software is perfect for deleting files selectively. Previously, I tested some other data erasers, and I did not get a satisfactory result. However, I was able to delete specific files from my iPhone using Wondershare.
3 Erase Deleted Files

To be sure this is not a hoax, I tried to recover deleted items on my iPhone after Wondershare SafeEraser application with recovery tools, and to my pleasant surprise, I could not recover them. SafeEraser actually made that impossible.
4 Support many Files

The software supports many files like iMessages, photos, videos, apps, calendar, Safari bookmarks, notes, and virtually any other data on iDevices. The good thing is that each of them can be deleted without affecting other data.

Cons
1 Not Free

Unfortunately, the software is not free. You have got buy it. Although there is a free trial version, it lasts for a short time and you will need to pay to keep enjoying it.
2 A Little Expensive

Compared with others, Wondershare SafeEraser is a little higher in cost ($40 for the popular offer). Also, the packages have less number of devices the software can be used on. Except for the "Family" package, the other two have just one device license.
3 Tax Included

When one makes a purchase of any of the packages, one also pay tax which definitely affects the total rate you cough out.Sponsor ads:

Jihosoft iPhone Data Recovery:https://www.jihosoft.com/recovery/ios-data-recovery.html

Jihosoft iPhone Data Recovery

Free iPhone Data Recovery Software for Windows/Mac

Recover up to 12+ types of files, including contacts, SMS, photos, WhatsApp, Viber, notes, etc.

Restore lost data from iOS devices directly or from iTunes and iCloud backup

Recover iPhone data lost due to iOS upgrade/jailbreak, accidental deletion, device lost or broken

Support all the latest iPhone, iPad and iPod Touch.

Tips:

How to transfer messages from iPhone to iPhone

Gihosoft Free iPhone Data Recovery:https://www.gihosoft.com/iphone-data-recovery-free.html

Gihosoft iPhone Data Recovery Free

2.19.2019

Top 5 Best iPhone Movie Players - Paid 2019


Top 5 Best iPhone Movie Players - Paid


GPlayer

Price: $2.99

Rating: 4.5/5

One of the great features about this player is that it is extremely easy to use and you can transfer your movie files quickly through WIFI. Many different movie formats will work just fine with it as well. The interface is simple and intuitive.


Oplayer

Price: $2.99

Rating: 4.0/5

For a well-rounded player that can play many kinds of files and has a great interface, Oplayer is perfect. It supports extras such as subtitles, and it even lets you watch streaming video easily through your Internet connection.


MoliPlayer Pro

Price: $2.99

Rating: 3.8/5

Do you like playing movies in different file formats, but are sick of having to constantly mess with the settings? Do you not know the difference between codecs and just want to play the movie automatically without any hassle? MoliPlayer Pro might be what you need. It will play just about any kind of movie that you give to it, and it will do it without the complaining that some other apps will do. You don’t have to mess with codec settings; just specify the file that you want to play and let it play.


8Player

Price: $5.99

Rating: 3.5/5

8Player has very good image quality and has tons of settings that you can tweak for the best movie viewing experience. It has a healthy range of file formats that it can play as well.

This is a little pricey, but if you’re looking for something that will actually make your movie files look nice, 8Player delivers.


GoodPlayer

Price: $2.99

Rating: 2.5/5

GoodPlayer is known for the many formats that it can play without a lot of hassle, including the usual major ones such as MP4. It lets to customize and edit the settings to your liking and you can add subtitles as well.


Sponsor ads:

Gihosoft Free iPhone Data Recovery:iphonerecovery.com

Free iPhone Data Recovery Software for Windows/Mac

Recover up to 12+ types of files, including contacts, SMS, photos, WhatsApp, Viber, notes, etc.

Restore lost data from iOS devices directly or from iTunes and iCloud backup

Recover iPhone data lost due to iOS upgrade/jailbreak, accidental deletion, device lost or broken

Support all the latest iPhone, iPad and iPod Touch

Both Free and Pro version.

If you lost data after you updated to a new iPhone, you can always use Gihosoft iPhone Data Recovery to get the data back from the old iPhone or backup.

Top 10 Best FRP Bypass Tools to Bypass Google Account on Android Device 2019

Worth reading:download youtube 1080p

If you use android phones, please choose Gihosoft Android Data Recovery

Jihosoft Android Data Recovery: the best Android Data Recovery software for Windows and Mac to recover deleted contacts, messages, photos, videos, WhatsApp and etc from Android

Fix iCloud not Backing Up?


As essential as it is, backing up your device is a process that can sometimes fail to work. An iCloud backup can particularly be problematic since most of the time you set it up to work automatically. If your iCloud backup didn’t work, this article will attempt to get to the root of the problem and hopefully fix it for you.
The Prerequisites for an Automatic iCloud Backup

For an iCloud backup to work, the following conditions need to be met.


First of all, your device needs to be connected to a Wi-Fi network


There also has to be adequate storage space in iCloud to allow for the backup


Your iPhone also needs to be plugged in to a power source


And the screen needs to be off, meaning the device needs to be asleep.
How to Fix an “iCloud Not Backing up” Error

If all of the above conditions have been met and you still don’t have an iCloud backup to show for it, you may have a problem. The following are some of the quickest and most effective solutions you can try. Try one after the other until the problem has been fixed.
1 Sign out and Sign back in your iCloud Account

It is entirely possible that there is a bug in the system and a simple sign out and sign in could do the trick. Try signing out of iCloud and then signing in again. If this doesn’t do it, check out our second solution.

Step 1: Click on Settings > iCloud.

Step 2: Slide down the screen until you see the "sign out" buttion.

Note: If you sign out of your account, all iCloud Drive document and dara stored in iCloud will be removed from your iPhone.


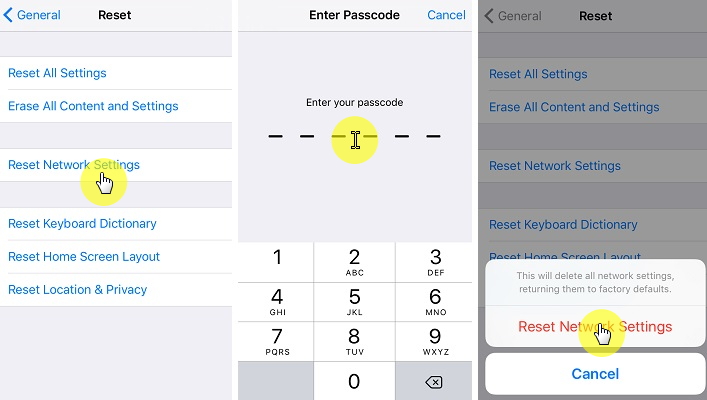
2 Reset Network Settings

Resetting the network settings might work to fix any problem you may be having with connectivity and hence fixing the backup problem. This is especially true if your device is having trouble connecting to a Wi-Fi network. Follow these simple steps to do it.

Step 1: Tap on Settings > General.

Step 2: Scroll to find “Reset” and tap on “Reset Network Settings”.

Step 3: Enter your password for your iPhone and click on “Reset Network Settings”to confirm the action.


If this doesn’t work, try our third solution.
3 Delete Old iCloud Backups

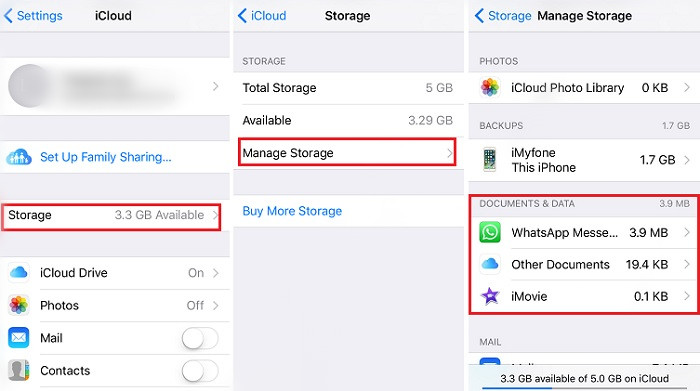
Like we mentioned above, you could be having trouble with your iCloud backups because of a lack available iCloud storage space. To check if you have adequate storage, follow these simple steps.

Step 1: Tap on Settings and scroll down to find “iCloud.”

Step 2: Tap on the “Storage” option located at the top of the screen.

Step 3: Tap on “Manage Storage” at the center of the screen. You can view the available storage on this page.

Step 4: You can also delete some of your old backups to create space. Just make sure that they are really old and that you don’t need the data in them anymore.

If this still won't work, check if any new iOS system update is available.


4 Disable Automatic Backup of Some Apps

In igeeksblog's opinion, the size of some apps may cause the failure of iCloud backup, even if you have enough avaiable storage in iCloud. It may be helpful if you try to disable some of the Apps from backup.

Step 1: Tap on Settings App > iCloud.

Step 2: Tap on Storage > Manage Storage under iCloud settings.

Step 3: Under the the DOCUMENTS & DATA category you can find a list of apps and the size of them. If you find some apps are taking heavy storage space, you can choose to disable them.


Step 4: To turn off the automatic backup of these apps, go to iCloud > iCloud Drive. Find the apps and turn them off.


5 Backup and Restore Device using iTunes

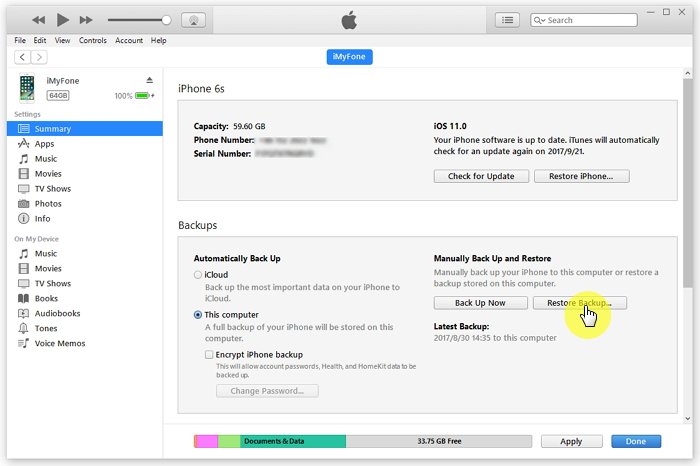
If you try all of the above but still can’t perform an iCloud backup, try backing up your device using iTunes. Simply connect the device to your computer and launch iTunes. Click on the iPhone and then click on “Backup Now” to back up the device.


You may also like:Sponsor ads:

Gihosoft Free iPhone Data Recovery:iphonerecovery.com

Free iPhone Data Recovery Software for Windows/Mac

Recover up to 12+ types of files, including contacts, SMS, photos, WhatsApp, Viber, notes, etc.

Restore lost data from iOS devices directly or from iTunes and iCloud backup

Recover iPhone data lost due to iOS upgrade/jailbreak, accidental deletion, device lost or broken

Support all the latest iPhone, iPad and iPod Touch

Both Free and Pro version.

If you lost data after you updated to a new iPhone, you can always use Gihosoft iPhone Data Recovery to get the data back from the old iPhone or backup.

Top 10 Best FRP Bypass Tools to Bypass Google Account on Android Device 2019

Worth reading:download youtube 1080p

If you use android phones, please choose Gihosoft Android Data Recovery

Jihosoft Android Data Recovery: the best Android Data Recovery software for Windows and Mac to recover deleted contacts, messages, photos, videos, WhatsApp and etc from Android

How to Manually Delete Recent Call History on iPhone? (Recoverable) 2019


How to Manually Delete Recent Call History on iPhone? (Recoverable)

You can manually clear call history from iPhone but it's not secure for your data. Unfortunately using this means will not clear your call history permanently because they can be recovered using top data recovery tools.

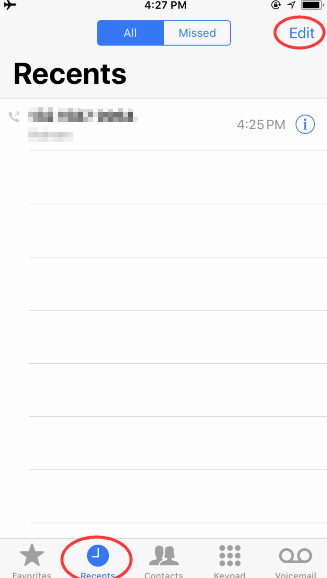
Therefore, for privacy protection and security reasons, using the common way to clear your call history is not enough and hence will require a better method which we will see next. Clearing your call history using the common method will involve deleting it from your phone app using the following steps:

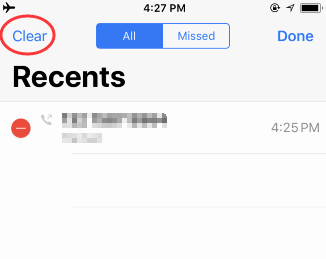
Step 1: Go to Phone App, it will automatically show you all the recent call history. If it isn’t, click “Recents”. Tap on the “Edit” button on the upper right corner.


Step 2: Then tap “Clear” on the upper left corner.


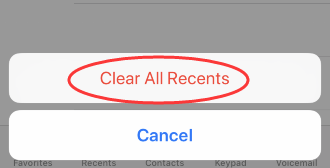
Step 3: On the pull up options, select “Clear All Recent” to confirm.


How to Manually Clear Recent Contacts on iPhone? (Recoverable)
1Hide Recent and Favorite Contacts from the Multitasking Screen

Your favorite and recent contacts can also be found in the iPhone/iPad Multitasking Screen. Double-click the home button and you can see them at the top. But what if you don't want your contacts to appear there? What If you want to keep your personal contacts from being peeped? Fortunately, you can turn it off!

Step 1: Go to your iPhone Settings app.

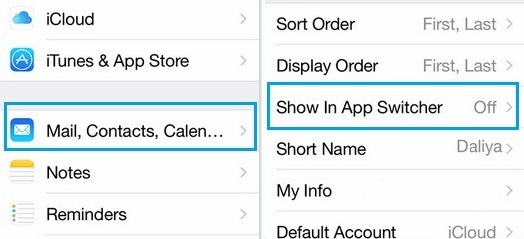
Step 2: Tap on “Contacts, Mail and Calendars”.

Step 3: Then tap on “Show In App Switcher”. You can find it right under the contacts session.


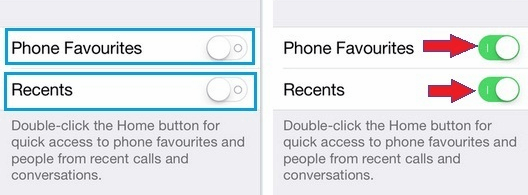
Step 4: Toggle Off the options for “Recent” and “Phone Favorites”.


2Remove Recent Contacts from Your iPhone’s Messages App

At the point of typing text messages, typing the first letter of the name in the “To” field will bring out recently contacted lists and the current list and unfortunately the list could be occupied by some unwanted contacts. This slows down messaging but there is a way to clear these unwanted contacts from recent lists as seen below.

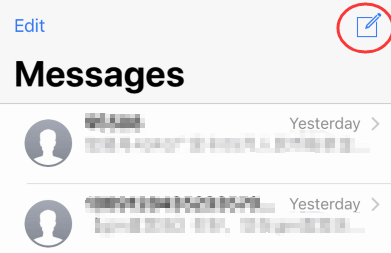
Step 1: Open your message App on iPhone. Firstly, click to create a new message.


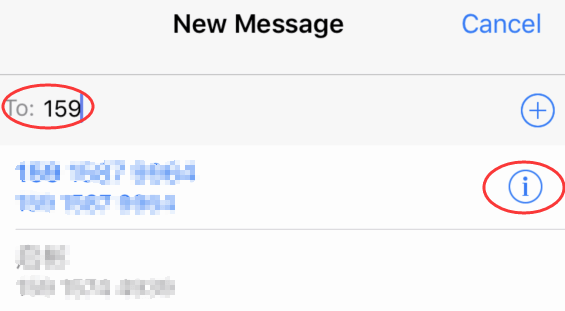
Step 2: Start tying a message with the letter of the alphabet you want to remove.

Step 3: Look for the contacts that has the “i” symbol to the right.


Step 4: Click on that symbol, when it show you the new interface. Choose “Remove from Recents”.


This solves the problem and you have to repeat the process for other unwanted contacts you want to remove.If you use android phones, please choose Gihosoft Android Data Recovery
How to Manually Delete Recent Safari Search History on iPhone (Recoverable)

Your iPhone Safari stores a lot of data about what you have searched. Usually this makes things easier for you, you can track down a website you've visited when you want it next time. But if you're worried about someone seeing something private on your Safari, you can clear the history. Easy steps like below:

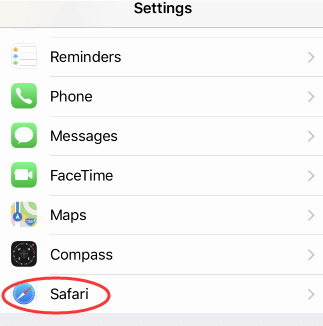
Step 1: Open the Settings app. Clearing your history through the Settings app will ensure that everything is deleted.

Step 2: Scroll down to find and tap "Safari".


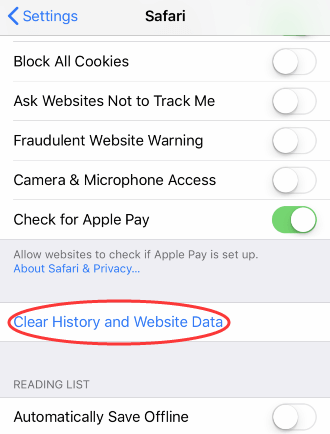
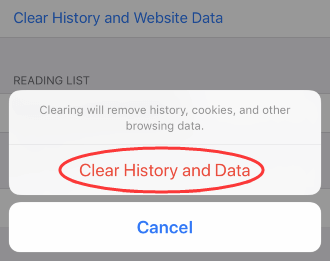
Step 3: Scroll down again in the Safari menu and find "Clear History and Website Data" Tap on it without hesitate.


Step 4: On the pull up options, just click “Clear History and Data” to continue. Your Safari browsing history, cache and cookies will be deleted.


You should know that delete Safari histories from iPhone directly may not clean them completely. It can be recovered with professional software. So I we suggest you to use iMyFone Umate Pro to delete recent safari search history on iPhone. It makes sure that these safari history won't be recovered anymore. Click the button below and have a try.Sponsor ads:Offline Music Apps for iPhone

Must Read:If you lost data after you updated to a new iPhone, you can always use Gihosoft iPhone Data Recovery to get the data back from the old iPhone or backup.

Gihosoft Free iPhone Data Recovery:iphonerecovery.com

2.18.2019

Best iTunes Alternatives for iPhone/iPad iOS 12 2018-2019


iTunes is known for being not user-friendly and open for its users. iTunes is the official platform to manage/transfer iPhone media but it is restrictive that you cannot manage your iPhone data at will. This really push lots of iTunes users to seek a best iTunes alternative iPhone.

There are a few limits to using iTunes that you may not even realize to transfer your music/videos/files between your iPhone/iPad and computer/iTunes library:


iTunes is restricted to only a handful of file formats. Only some specific formats are supported. Or you need to use converter in advance.


iTunes can often run very slowly and inefficiently on PC’s. It is simply too big and clunky of a program. Many times it will also run on start-up, slowing down your PC from the moment it boots.

Also Read:How to Turn Photos into Cartoons and Anime Drawings?
Also Read:Top 6 Windows Photos Alternatives to View Photos on Windows 10
Also Read:How to Unlock Disabled iPhone 4s/5/6s/7/8/X/Xs with/without iTunes or Computer
Also Read:How to Fix Windows was Unable to Format SD Card/USB Drive
Also Read:Format Factory Alternative for Mac – Convert Videos on Mac
Also Read:How to Fix the “Black Screen of Death” on iPhone XS/X/8/7
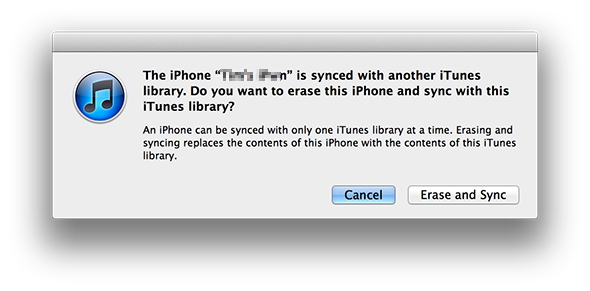
Existing files on iPhone/iPad will be covered when syncing with iTunes. When using iTunes sync to add music/videos/files to iPhone, the existing data will be deleted as well.


An iPhone can be synced to only one computer. If you try to sync an iPhone with another computer/iTunes library, your iPhone will be erased.


If you enjoy having the freedom to move and use your music files as you wish, then perhaps a third-party iTunes alternative would be best for you. You do have a choice! Here are some great iTunes alternative that will make your iOS device more open and easier to use:
#2. CopyTrans - A Simple iTunes Alternative


CopyTrans is the also a complete alternative tool to transfer music, photos, videos, contacts and more from PC to iPhone, iPad and iPod without needing to go through iTunes in the process. However, it's only available for Windows PC. No Mac version is available yet. If you're looking for an alternative to iTunes Mac OS X, you should try CopyTrans alternative for Mac.

Pros:

· Easy transfer. · Transfer by categories like Artist, Album etc.. · It doesn't need you to use iTunes.

Cons:

· Doesn't transfer .wma. · Doesn't detect music automatically when the device is plugged in.

Price: $29.99

Supported OS: Windows 7, 8, 10, Vista and XP.

Rank: (4.5/5 stars)
Bonus Tips:
Restoring Lost Photos and Videos from iPhone

If you have deleted some of your pictures or videos from your gallery, then there is a straightforward way to Recover Deleted Files iPhone back.

After you delete the media files from your gallery, be it photos or videos, then you must know that iOS has a feature that the deleted media files doesn’t get deleted immediately, but it gets compiled to a temporary folder from where it gets deleted after 30 days. If you lost data after you updated to a new iPhone, you can always use Gihosoft iPhone Data Recovery to get the data back from the old iPhone or backup. Should you wish to recover these files, you must go to that “recently deleted” folder and retrieve these files before 30 days.

If you use android phones, please choose Gihosoft Android Data Recovery.

Worth reading:Best youtube downloader online download youtube 1080p

Must Read:

How to transfer messages from iPhone to iPhone

Must read:icloud activation lock removal

Must read:Gihosoft Free iPhone Data Recovery:https://www.gihosoft.com/iphone-data-recovery-free.html

2.17.2019

Disabled iPhone has synced with iTunes before 2019


Disabled iPhone has synced with iTunes before
Erase and Recover Data from Disabled iPhone using iTunes

If you have synced this iPhone or iPad with the computer before, you still have the possibility to make a backup of your iPhone with iTunes. Without this premise, you will be unable to make your iPhone trust the computer or unlock your device without a password, and you device will not be connected to iTunes successfully then.

Step 1: Open iTunes and connect your iPhone or iPad to this computer through USB cable.

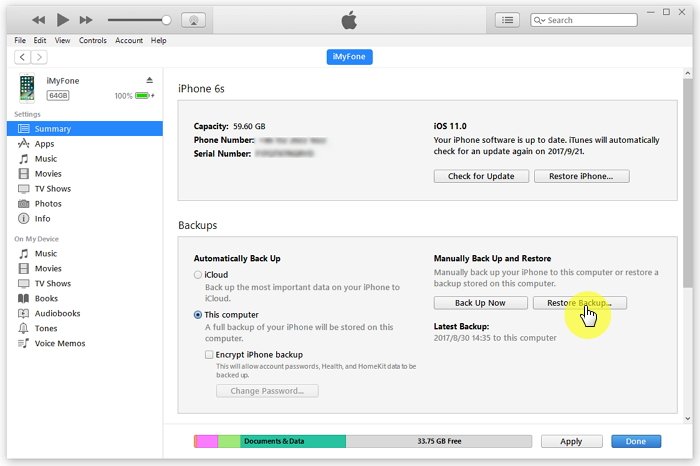
Step 2: When your iPhone appears on iTunes, select it. Then you should click on the "Back Up Now" button to continue. When the backup process is finished, the iTunes backup file will be saved on the computer.

Also Read:Top 6 Windows Photos Alternatives to View Photos on Windows 10

Also Read:XD Card Recovery – Recover Deleted Photos from xD-Picture Card

Also Read:How to Convert SWF to MP4 on Mac or Windows

Also Read:How to Fix the “Black Screen of Death” on iPhone XS/X/8/7


Then follow these simple steps to restore the device and hence enable it:

Step 1: Connect the iPhone to the computer you synced with and then wait for iTunes to sync with your device and create a backup.

Step 2: Once the sync is done, click "Restore iPhone" and once you get to the Setup screen while restoring the iPhone tap "Restore from iTunes backup." Select the latest backup to restore the device.


Erase your Device with Recovery Mode

If you hadn't set up Find my iPhone on iCloud or synced your device with iTunes, you can erase the device in recovery mode. Here's how to do it.

Step 1: Connect the iPhone to the computer and launch iTunes.

Step 2: Force the iPhone to restart. You can do that by holding the Sleep/Wake and the Home buttons down at the same time until you see the recovery screen. (For iPhone 7, you hold the Sleep/Wake and Volume Down Buttons)

Step 3: When you see the option to Restore or Update the iPhone popup in iTunes, choose "Restore" and iTunes will download the software for the device.


Step 4: Wait for the process to finish and then set up the device as new. If the process takes more than 15 minutes, the device will exit recovery mode and you need to start again.
Disabled iPhone has never synced with iTunes

If you've never synced with iTunes, you'll need to use recovery mode to restore your device. This will erase the device. Please make sure that you have set up Find my iPhone in iCloud before. Here's how to do it.

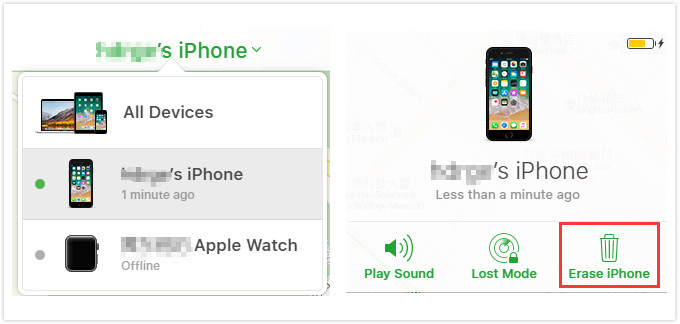
Step 1: From any other device go to https://www.icloud.com/find and then sign in with your Apple ID.

Step 2: Click on "All Devices" and then select the device you want to erase. Click "Erase iPhone" to erase the device.


Step 3: You can choose to restore the device or set it up as new.
Part 4: Tips for Some Specific Situations with iPhone Disabled


Tips for users whose iPhone is disabled due to forgetting screen passcode


Tips for users whose iPhone is disabled due to iOS issues


Tips for users whose iPhone is disabled due to hardware issues
1Tips for users whose iPhone is disabled due to forgetting screen passcode:
Phase 1: Unlock your device:

The methods to unlock your device have already been described as above. According to Apple officially recommendation, there are two ways to erase your iPhone without password. But you need know that if your device is erased, your current data will not be recovered directly. You must rely on your backup.Restoring Lost Photos and Videos from iPhone

If you have deleted some of your pictures or videos from your gallery, then there is a straightforward way to Recover Deleted Files iPhone back.

After you delete the media files from your gallery, be it photos or videos, then you must know that iOS has a feature that the deleted media files doesn’t get deleted immediately, but it gets compiled to a temporary folder from where it gets deleted after 30 days. If you lost data after you updated to a new iPhone, you can always use Gihosoft iPhone Data Recovery to get the data back from the old iPhone or backup. Should you wish to recover these files, you must go to that “recently deleted” folder and retrieve these files before 30 days.

If you use android phones, please choose Gihosoft Android Data Recovery.