2.28.2019

Fix iPhone Calendar Not Syncing with Mac

Fix iPhone Calendar Not Syncing with Mac

Do you face any issues of iPhone calendar not syncing with Mac? This article serves as an eye-opener to resolve this problem. There are different optimum solutions being available to sync the calendar app from your iPhone with the Mac. Let us take a closer look at each method and try out the steps listed in each section in order to achieve successful results. The steps are very simple and it is enough if you carefully read through the guidelines given below. The synchronizing concerns can be resolved by you without knocking the doors off the iPhone stores. Few clicks are sufficient to overcome the synchronizing complications.


Tip 1. Change default account to iCloud


Tip 2. Disable and enable iCloud Contacts, Calendar, or Reminders


Tip 3. Check calendar settings from iCloud


Tip 4. Ultimate Way to sync iPhone calendar with Mac
1. Change default account to iCloud

You may face the calendar synchronizing issue if your iPhone displays the Google calendar service. So here you have to change the default calendar settings to iCloud calendar to derive a permanent solution to this problem. I am sure immediately a question will arise in your mind that how to change the default calendar settings? Just have a glance at the below steps to change the calendar default settings.

Step 1: Unlock your iPhone and go to the ‘Settings’ option.

Step 2: Select the ‘Calendar’ from the list.

Step 3: Choose ‘Default calendar’ from the displayed options.

Step 4: Select the Calendar which is visible under the iCloud.

Now you have successfully changed the default calendar settings to iCloud calendar. Try out to sync your iPhone calendar with Mac. You can proceed to the next method if you still face the issue.
2. Disable and enable iCloud Contacts, Calendar, or Reminders

Here is the next simple method to obtain a permanent solution for synchronizing problem. Try to turn on and off the iCloud contacts, calendar and reminders. Follow the instructions discussed below to carry out this process. It is very easy and you have to adopt this method if you feel that there is no issue with your iPhone and Mac device. This procedure is done to refresh the iCloud platform and restore to its default settings.

Step 1: Unlock your iPhone and navigate to ‘Settings’.

Step 2: Enter your name and go ahead by selecting the ‘iCloud’ option. In case, if you own an iOS 10.2 or earlier then you can directly select the iCloud option from the ‘Settings’ menu.

Step 3: Slide to the ‘Contacts’ option and toggle the switch between off and on.

Now restart your device and try out the calendar synchronizing task. Go ahead with the next method if your attempt in synchronizing results in failure.
3. Check calendar settings from iCloud

You have to make sure whether your iPhone is connected with the iCloud calendar. To verify this settings try out the below stepwise process.

Step 1: Open your iPhone and tap the ‘Calendar’ app.

Step 2: Click the lower middle of the screen in the ‘Calendar’.

Step 3: Select the option ‘Show all’ which is available at the right bottom in the screen.

Step 4: With the help of the above step you can verify whether the iPhone displays the iCloud calendar.
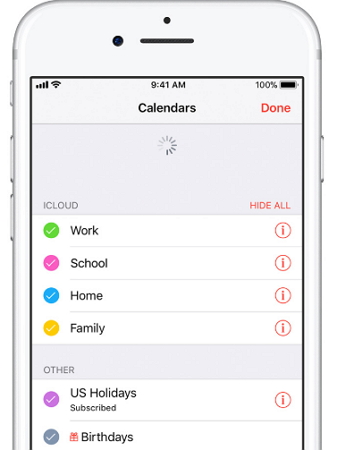


You will be able to synchronize your iPhone calendar with the Mac only if the device displays the calendar app from the iCloud platform. So you have to check whether the calendar settings are properly before trying out the syncing process.
4. Ultimate Way to sync iPhone calendar with Mac
Also Read:XD Card Recovery – Recover Deleted Photos from xD-Picture Card
Also Read:How to Convert SWF to MP4 on Mac or Windows
Also Read:7 Best iPhone Photo Editor Apps To Achieve Filter and Psychedelic Look


Also Read:5 Best Free Movie Streaming Sites like Pubfilm to Watch Movies Online 2019

Fixes You Can Try for "iPod Touch Won't Sync with iTunes" Issue


Many times, we suffer with an unstable Wi-Fi or a service outage in our area, so that Wi-Fi fails to work properly. This could be frustrating and especially when there is a new update available in the iPhone and you really want to install it as soon as possible. Well! If you are in this situation, it is understood that updating to the latest iOS (iOS 12 for now) without WiFi has become essential for you by now. You can read this article and get help from it. We will answer your question that 'can you update iOS without Wi-Fi or not'? Keep scrolling and find the solutions.


1. Can You Update iOS without Wi-Fi?


2. Update iOS Using iTunes without Wi-Fi


3. Update iOS Using Cellular Data


4. Update iOS using a Third-party Tool without Wi-Fi
1. Can You Update iOS without Wi-Fi?

If you're not having a proper Wi-Fi connection or don't have a Wi-Fi at all to update iPhone to the latest version iOS 12, don't bother, you can certainly update it on your device without Wi-Fi. However, please note that you will need other internet connection than Wi-Fi for an update process. Please make sure your computer has been connected to network or you have mobile data to proceed for the process. Also, please check if your device is having enough storage to get the newest update iOS 12 since the process eats lots of space.
2. Update iOS Using iTunes without Wi-Fi

The first way through which you can update iOS without Wi-Fi is using iTunes. Please ensure that you have a backup of your data before proceeding to the steps since the existing data might get lost after the updating. In addition, make sure that iTunes has been updated to the latest version on your PC. Now, follow the steps to update your iPhone into latest iOS which is iOS 12 for now.


Launch iTunes in PC and make connection between iPhone and PC using USB cord.


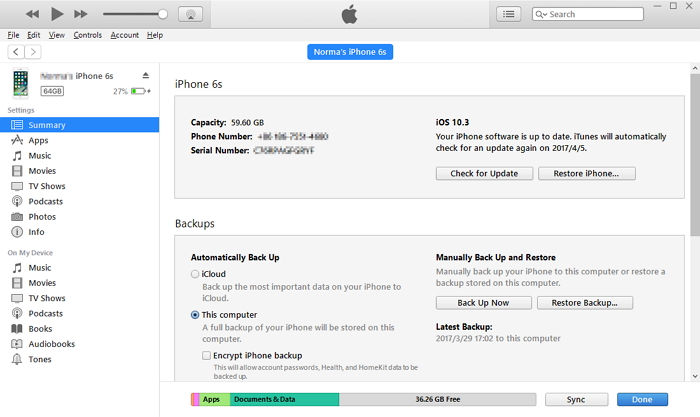
Choose the device icon at the top left and hit on 'Summary' tab.


Click on 'Check for Update' now followed by 'Download and Update'.


Type in passcode if prompt and your device will get updated in a while.


3. Update iOS Using Cellular Data

As said above, updating your iPhone to the new update iOS 12 will always calls for an internet connection, so here is the next way to update iOS without Wi-Fi and that is updating via cellular data. Make sure to have enough data plan in your device since the updating process consumes a lot of data. Also, ensure that your device's battery is not less than 50%. Once checking all this, read the following steps to update your iPhone.


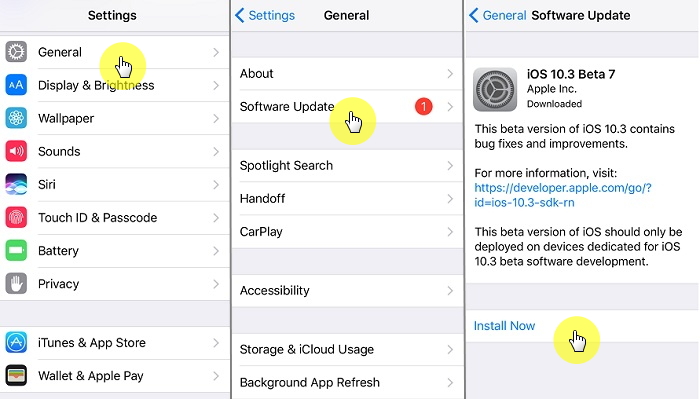
Firstly, turn on the cellular data and open 'Settings' in your device.


Go to the 'General' option and tap it.


Now, look for 'Software Update' and tap on it. Your iPhone will follow your command and will look for the update and will inform you. After this, tap on 'Download and Install' button and follow the prompts.


Now, the updating process will begin and on completion of downloading, a pop-up will ask you to install the iOS right now or later. Tap 'Install Now' and your installation will start. Now iOS 12 is available.


While installing, your iPhone's screen will go black showing Apple logo and the installation status. Once finishing installation, the device will restart and then you will be asked to enter the passcode. Type in your passcode and you're good to go. You can use your device now with the latest iOS update in it.


4. Update iOS using a Third-party Tool without Wi-Fi

Here is the next best option you can try if you want to update iPhone without Wi-Fi. An expert third-party tool like iMyFone D-Backcan always help you but remember that internet connection is also needed. D-Back is basically a professional and efficient data recovery tool that has been recommended by the famous media sites like Macworld and Makeuseof. It is completely free of any harmful virus and secure to use. On a plus, there is no need to panic about your data since this tool promises no data loss while updating or fixing any iOS issue such as iPhone stuck on Apple logo/recovery mode/white screen/black screen, freezing issues and so on. You can use it easily and following are the steps to use this tool.Sponsor ads:

Gihosoft Free iPhone Data Recovery:https://www.gihosoft.com/iphone-data-recovery-free.html

Gihosoft iPhone Data Recovery Free

Free iPhone Data Recovery Software for Windows/Mac

Recover up to 12+ types of files, including contacts, SMS, photos, WhatsApp, Viber, notes, etc.

Restore lost data from iOS devices directly or from iTunes and iCloud backup

Recover iPhone data lost due to iOS upgrade/jailbreak, accidental deletion, device lost or broken

Support all the latest iPhone, iPad and iPod Touch

Both Free and Pro version.

If you lost data after you updated to a new iPhone, you can always use Gihosoft iPhone Data Recovery to get the data back from the old iPhone or backup.You may also like: iphonerecovery.com

If you use android phones, please choose Gihosoft Android Data Recovery.

With Gihosoft Android Data Recovery, no longer afraid of data loss!

Must read:Youtube video downloader for pc

Gihosoft RePicvid Free Photo Recovery Software provides a free photo recovery software for windows to help users recover the deleted or lost photo for free.

Jihosoft Android Data Recovery: the best Android Data Recovery software for Windows and Mac to recover deleted contacts, messages, photos, videos, WhatsApp and etc from Android devices.Tips:How to transfer messages from iPhone to iPhone

jihosoft Free iPhone Data Recovery
Sponsor ads:8 Best PDF Reader & Editor Apps for iPhone and iPad in 2019
Sponsor ads:How to Access and Unlock Android Phone with Broken Screen
Sponsor ads:How to Remove Duplicate Contacts on iPhone and Android Quickly
Sponsor ads:How to Download & Save YouTube Videos to iPhone’s Camera Roll


Sponsor ads:Best 2 Free Methods to Fix Slow USB Transfer Speeds

2.27.2019

iMessage Showing Only Numbers, No Names. How to Fix?


1. Try to Change One Name Slightly

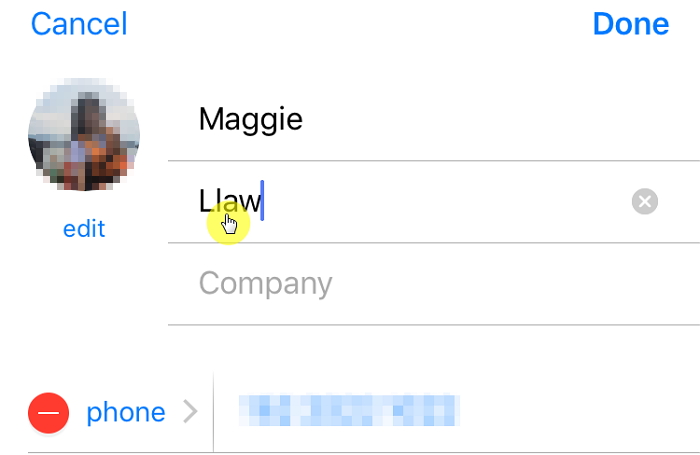
The first thing you should try to fix this problem is to make a slight change to one of the names in your contacts. Open the Contacts app and edit one of the names. The change doesn't have to be significant; you can simply add a number or symbol. When you save the contact, a "refresh" of the contacts will be triggered, fixing the problem.


2. Try to Edit the Country Prefix

Some people have also found that by removing the country code from the number can also work to "refresh" the contacts and fix the problem. Here's how to do that;

Step 1: Open the Contacts app from the Home screen of the device.

Step 2: Tap on the contact whose country code you want to remove.

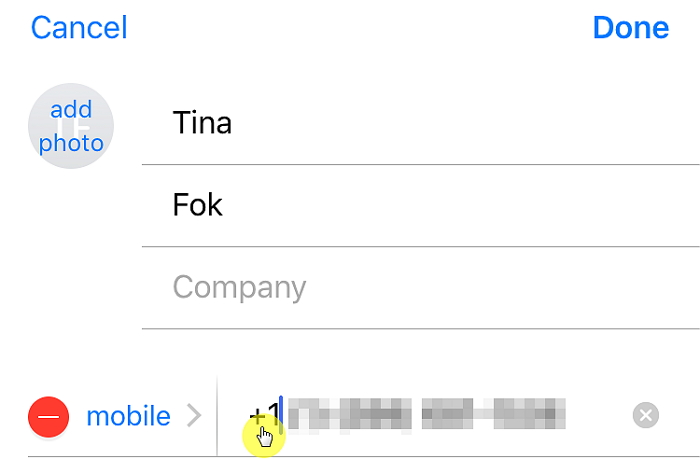
Step 3: Tap "Edit" in the upper-corner and tap in the number field to remove the country code.

Save the changes and see if this fixes the problem. It is worth noting that sometimes adding a county code at the beginning of a number will also have the same effect.


3. Try Turning Off Contacts in iCloud

Toggling Contacts in iCloud can also work to fix the problem especially when you have synced your contacts with iCloud. Here's how to do it;

Step 1: Open Settings and the Tap on Your Apple ID at the top of the menu.

Step 2: tap iCloud and then turn off "Contacts".

Step 3: When prompted, choose to "Delete from my iPhone".


4. Close Messages Completely and Restart the iPhone

If none of the above solutions work, try closing the messages apps completely and then restart the iPhone.

Step 1: Double tap on the home button to bring up the multi-tasking screen.

Step 2: Locate the messages app and the swipe up on the preview window to close the messages app.

Step 3: Now restart the iPhone and open the messages app to see if the problem has been fixed.
5. Make Sure Your Contacts Are Syncing

You can also check to see if your contacts are syncing with you preferred third-party accounts such as Outlook, Google, Yahoo and others. Here's how to do that;

Step 1: Go to Settings > Accounts and Passwords or if you are using iOS 10 and earlier, go to Settings > Mail > Accounts.

Step 2: Check that "Contacts" is turned on if you want to contacts to sync with the device.


6. Manage Multiple Contact lists on iPhone

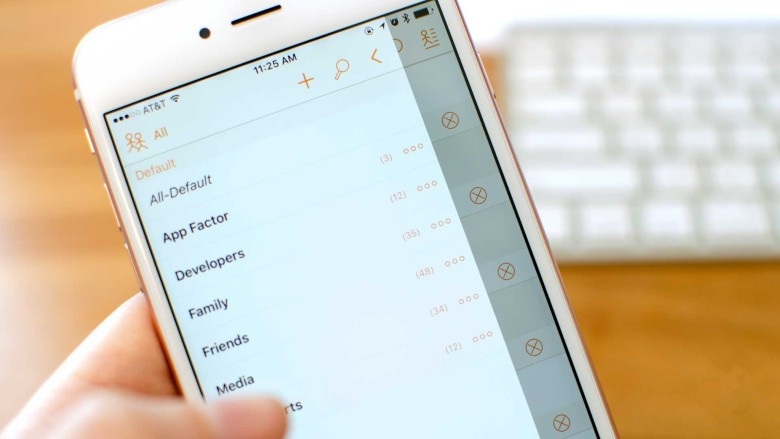
This problem can also arise when you are using multiple contact lists. If you have separate lists or work, family and friends issues can occur when you try to sync all of these contacts on the same device. If you use multiple contact lists try to combine the duplicated contacts into a master list. You can merge duplicated contacts on the iPhone with these simple steps;

Step 1: Open the Contacts App and then scroll through the list of contacts to find the one you'd like to merge.

Step 2: Tap on the "Edit" button and scroll down to find the "Link contacts…" option.

Step 3: Tap on it and you'll go back to the list of contacts. Select the name you want to merge with the one you are editing. Tap on it and then tap on "Link" in the upper right-hand corner of the screen. Tap "Done."

Repeat this with all the other duplicated contacts, although if you have too many, you may want to use one of the many "Merge Contacts" apps available.


7. Fix the Issue By Fixing Your iOS

Sometimes the problem can be a software issue that is hard to diagnose and fix. A third-party tool like iMyFone iOS System Recoverycan be used to fix the system and get the device working correctly again. The following are some of the program's features; Sponsor ads:

Gihosoft Free iPhone Data Recovery:https://www.gihosoft.com/iphone-data-recovery-free.html

Gihosoft iPhone Data Recovery Free

Free iPhone Data Recovery Software for Windows/Mac

Recover up to 12+ types of files, including contacts, SMS, photos, WhatsApp, Viber, notes, etc.

Restore lost data from iOS devices directly or from iTunes and iCloud backup

Recover iPhone data lost due to iOS upgrade/jailbreak, accidental deletion, device lost or broken

Support all the latest iPhone, iPad and iPod Touch

Both Free and Pro version.

If you lost data after you updated to a new iPhone, you can always use Gihosoft iPhone Data Recovery to get the data back from the old iPhone or backup.You may also like: iphonerecovery.com

If you use android phones, please choose Gihosoft Android Data Recovery.

With Gihosoft Android Data Recovery, no longer afraid of data loss!

Must read:Youtube video downloader for pc

Gihosoft RePicvid Free Photo Recovery Software provides a free photo recovery software for windows to help users recover the deleted or lost photo for free.

Jihosoft Android Data Recovery: the best Android Data Recovery software for Windows and Mac to recover deleted contacts, messages, photos, videos, WhatsApp and etc from Android devices.Tips:How to transfer messages from iPhone to iPhone

jihosoft Free iPhone Data Recovery

iPhone Favorite Contacts Not Working. How to Fix?


The Most Common Issues with iPhone Favorite Contacts

Some of the most common problems users have reported with their Favorites contact feature include the following;


Favorite contacts list shows different numbers from the one's you added.


Users have also reported being unable to add new contacts to the favorite list.

The following solutions should fix these issues and any other you may be facing;
1. Check Whether Contacts Are Syncing

The first thing you should do before taking any troubleshooting solutions is to check whether your contacts are syncing correctly with your preferred third-party accounts like Google and Yahoo. Here's how to check that your contacts are syncing;

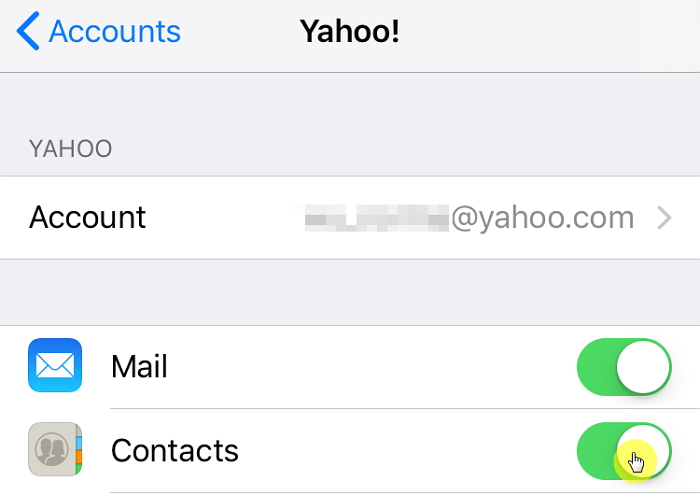
Step 1: Go to Settings> Accounts & Password if you are using iOS 10 and later versions. Or, go to Settings > Mail > Accounts if you are using iOS 10 and earlier.

Step 2: Tap on each account that is listed there to check whether "Contacts" is toggled on.

Here we take Yahoo email account as example.


2. Check If the Problem is Caused by Duplicate Contacts

Sometimes the problem can be caused by the presence of duplicated contacts. You can check if there are duplicated contacts by going to icloud.com log in, click on contacts and then check if there are duplicated contacts.

But doing this if you have more than one duplicate can be difficult and time consuming. Instead, you can use the contacts app on your Mac to merge the contacts. Follow these simple steps to do that;

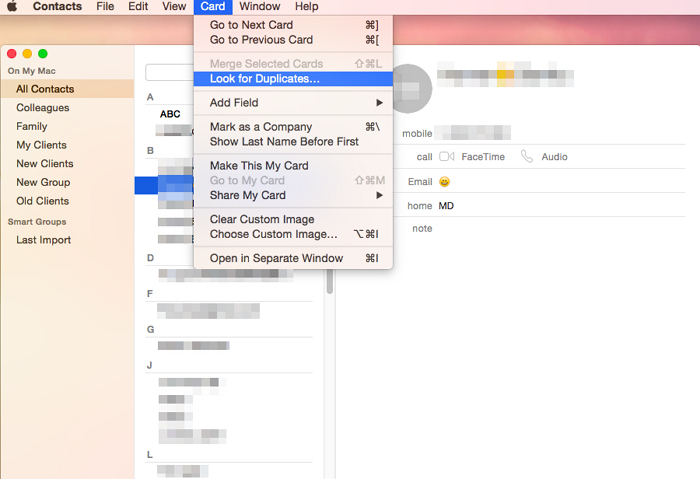
Step 1: Open the contacts app on your Mac and the click on "Card." From the drop-down menu select "Look for Duplicates."

Step 2: You should see a popup appear telling you the number of duplicates found. Click "merge" to eliminate the duplicated contacts.

Once done, the contacts will sync with the iPhone if you gave enabled iCloud on both devices.


3. Manage Your Linked Contact Information

The link feature allows you to link different contact information that may be duplicated. It is a useful feature that allows you to link a contact that may have synced from your third-party accounts with the same number you may have entered manually. If the linked numbers are incorrect, you may experience issues with the favorites. Here's how to fix that;

Step 1: Open the contact that is causing problems within favorites. You should also scroll down to check if the contact is correct in multiple accounts.

Step 2: Edit the number so it is same on all accounts.

Step 3: Open the favorites to show that both numbers are reflected correctly.
4. Re-Sign in to Your iCloud Account

If none of the above work, iCloud contacts syncing maybe the problem. In this case, you may want to sign out and the re-sign in to iCloud. Doing this may trigger a re-fresh of your contacts and solve the problem. Here's how;

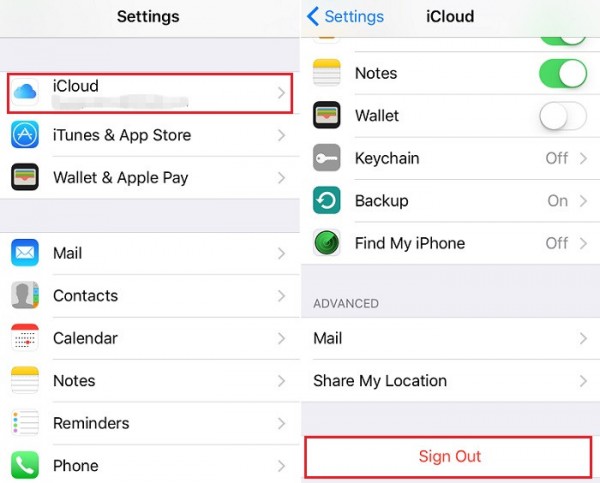
Step 1: Tap on Settings > iCloud.

Step 2: Sign out of iCloud.

Step 3: Wait a few seconds and then sign back in to iCloud.


5. Fix Issues by Completely Re-Installing Your iOS

If the solutions above fail to produce the desired result, you may have to completely reinstall the iOS on your device to fix the problem. A third-party tool like iMyFone iOS System Recovery will help you do that without risking the data on your device. This tool can be used to fix just about any issue you may be experiencing with your iOS device including an iPhone stuck in Recovery Mode or DFU mode, or an iPad gives no response and many other issues. It is easy to use and will have your iPhone working properly again in a few minutes.Sponsor ads:

Gihosoft Free iPhone Data Recovery:https://www.gihosoft.com/iphone-data-recovery-free.html

Gihosoft iPhone Data Recovery Free

Free iPhone Data Recovery Software for Windows/Mac

Recover up to 12+ types of files, including contacts, SMS, photos, WhatsApp, Viber, notes, etc.

Restore lost data from iOS devices directly or from iTunes and iCloud backup

Recover iPhone data lost due to iOS upgrade/jailbreak, accidental deletion, device lost or broken

Support all the latest iPhone, iPad and iPod Touch

Both Free and Pro version.

If you lost data after you updated to a new iPhone, you can always use Gihosoft iPhone Data Recovery to get the data back from the old iPhone or backup.You may also like: iphonerecovery.com

If you use android phones, please choose Gihosoft Android Data Recovery.

With Gihosoft Android Data Recovery, no longer afraid of data loss!

Must read:Youtube video downloader for pc

Gihosoft RePicvid Free Photo Recovery Software provides a free photo recovery software for windows to help users recover the deleted or lost photo for free.

Jihosoft Android Data Recovery: the best Android Data Recovery software for Windows and Mac to recover deleted contacts, messages, photos, videos, WhatsApp and etc from Android devices.Tips:How to transfer messages from iPhone to iPhone

jihosoft Free iPhone Data Recovery

5 Tips on How to Reset iPhone Battery to Improve Performance


5 Tips on How to Reset iPhone Battery to Improve Performance
Why does my iPhone battery die so fast? There are many reasons why this may be happening, and we’ve listed the reasons why iPhone battery die so fast in the following paragraphs, and showed you tips to get iPhone battery reset.


The material properties of lithium-ion batteries require constant recharging at least once in a month. If you haven’t recharged your iPhone battery in 1 month or more, your battery indicator may display inaccurate numbers.


Every iOS update brings about new battery-intensive features. You may have to allow the battery to fully drain before recharging it to detect the full range of battery life.


Running many apps and downloads simultaneously on your iPhone can cause fast battery drain.


Having too many junk files, app fragments, and redundant files on your iPhone can cause battery drain.


Using high graphic themes, playing games, background app refresh, location services, high screen brightness, and manual download can be the cause why your iPhone battery is dying fast.


Part 1: Detailed Steps on How to Calibrate iPhone Battery


Part 2: 5 Tips to Reset iPhone Battery
Part 1: Detailed Steps on How to Calibrate iPhone Battery

Calibrating your iPhone battery gives it the right push for better battery indicator accuracy. Here are the calibration steps:

Step 1To start the calibration process, completely drain your iPhone battery to 0%; keep using it until it powers down automatically.

Step 2Leave your iPhone powered down for about 6 hours to further drain the battery.

Step 3Plug your iPhone into a charging source, and charge it with the right charger up-to 100%. When it has charged up-to 100%, let it charge for another 2 hours.

Step 4Unplug your iPhone from the charging source, and use as normal again. Drain the battery life to zero again.

Step 5Repeat the 3rd step. This time, after it charges to 100% let it charge to another 1 hour.


After these steps, your iPhone battery is fully calibrated for accuracy.
Part 2: 5 Tips to Reset iPhone Battery

How to reset iPhone battery? There are some precautionary methods and guides that can help you. Here are some of them:
Tip 1: Switch Off Background App Refresh

Having the knowledge on how to manage background app refresh on iPhone, iPad or iPod touch is important in resetting iPhone battery. It helps you to control which apps can refresh in the background, in order to minimize tons of battery power and resources these apps consume. Here is how to turn off background app refresh on iPhone, iPad or iPod touch.

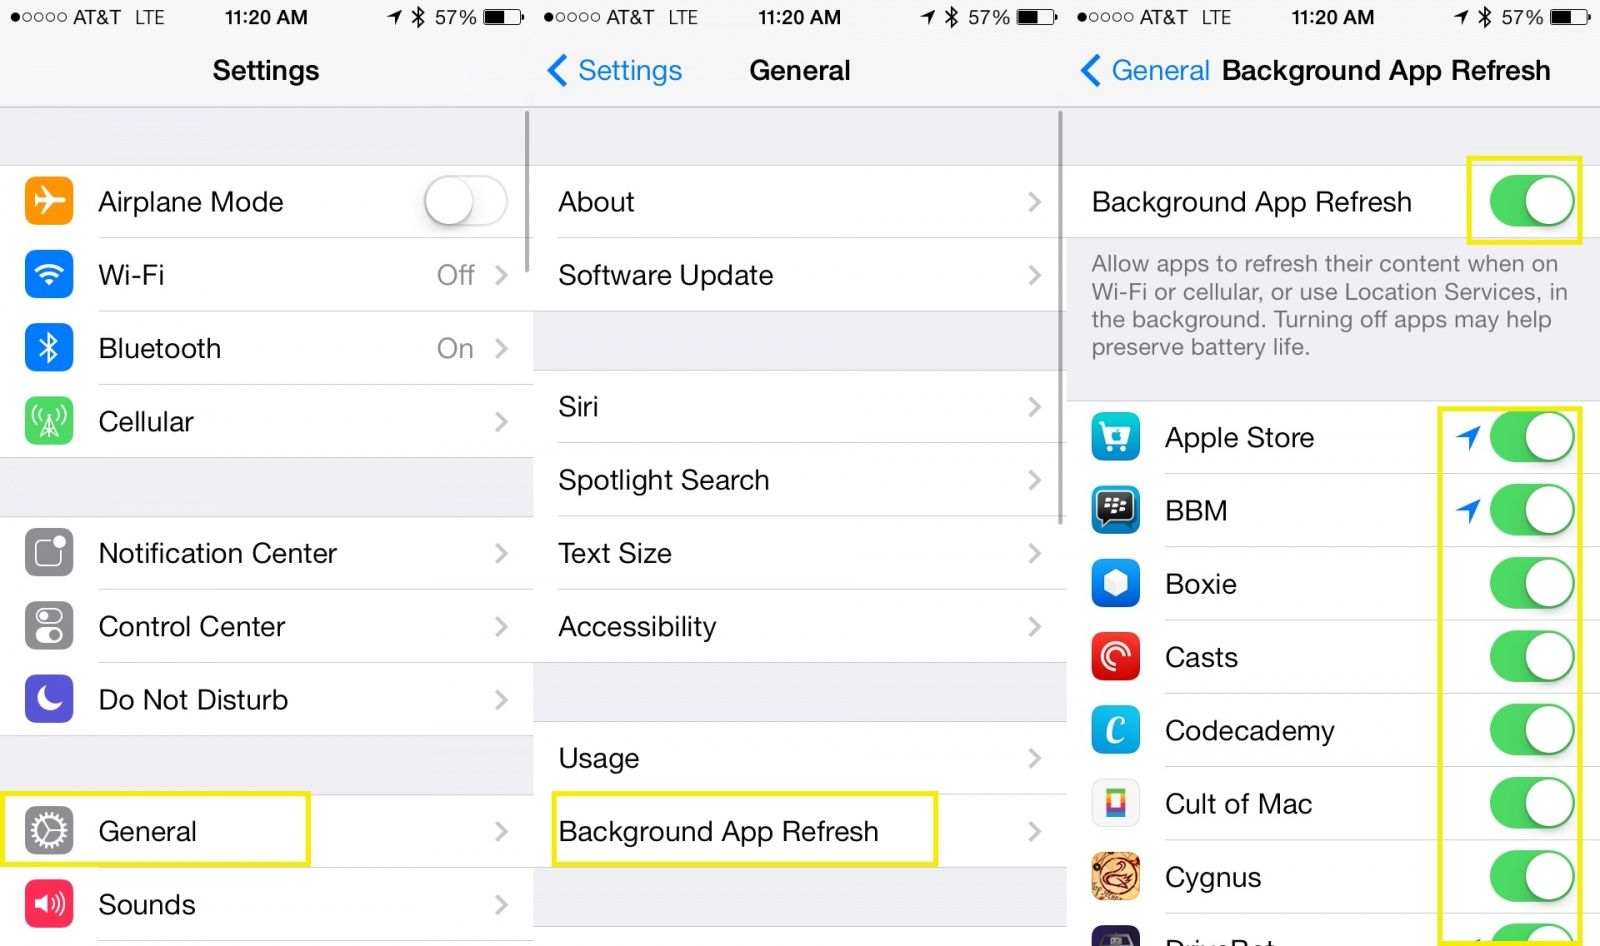
Step 1Launch the Settings app on your iPhone.

Step 2Click General > Background App Refresh.

Step 3Slide Background App Refresh switch to the left to Off. The switch will turn gray when off.


Tip 2: Deactivate Location Services

iPhone location service is another default application that consumes tons of iPhone battery power and leads to wrong battery calibration. Turning this service off is usually helpful in maximizing iPhone battery life.

Step 1Open your iPhone Settings app.

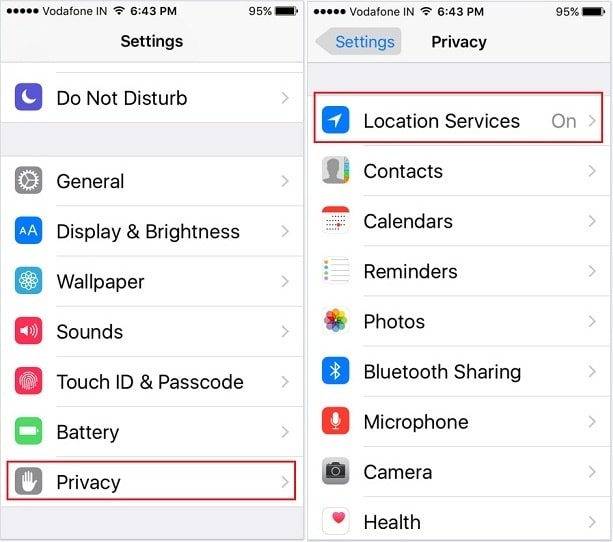
Step 2Scroll down to open the Privacy menu item, and click Location Services at the top of the screen.

Step 3Next to Location Services is a green switch that you can slide to the left to disable Location Services. Tap it to turn gray, and your location service is off.


Tip 3: Decrease iPhone Screen Brightness

Bright iPhone screen is good for sight, but it’s also a huge battery drainer. If you adjust the screen brightest, you’ll tend to have more battery life over time. But before you can manually decrease your iPhone screen brightness, you’ll have to switch off Auto-brightness feature.

Step 1Click Settings > Display & Brightness.

Step 2Auto Brightness is the green switch, click on it to disable it. It will turn gray when switched off.

Step 3Adjust the manual screen brightness meter to your comfort level.


Tip 4: Opt for Manual Downloads

You already know that automatic update of iOS apps and manual downloads have effects on battery life. Some of your iPhone apps are rarely used but they are the ones getting the most update and draining your battery. You can off this feature by following these steps:

Step 1Click Settings app from your iPhone Home interface.

Step 2Tap iTunes & App Store.

Step 3Scroll down to Automatic Downloads and you’ll see four options: Music, Apps, Books & Audiobooks, and Updates.

Step 3Slide the switch button next to the options to the left to turn them off.


Tip 5: Clean up iPhone Space and Improve iPhone Battery Performance

Some residue files and caches on your iPhone can also drain your battery. In this regards, how to reset battery on iPhone? Try to clean up iPhone space to erase and delete those files and caches.

Sponsor ads:

Gihosoft Free iPhone Data Recovery:https://www.gihosoft.com/iphone-data-recovery-free.html

Gihosoft iPhone Data Recovery Free

Free iPhone Data Recovery Software for Windows/Mac

Recover up to 12+ types of files, including contacts, SMS, photos, WhatsApp, Viber, notes, etc.

Restore lost data from iOS devices directly or from iTunes and iCloud backup

Recover iPhone data lost due to iOS upgrade/jailbreak, accidental deletion, device lost or broken

Support all the latest iPhone, iPad and iPod Touch

Both Free and Pro version.

If you lost data after you updated to a new iPhone, you can always use Gihosoft iPhone Data Recovery to get the data back from the old iPhone or backup.You may also like: iphonerecovery.com

If you use android phones, please choose Gihosoft Android Data Recovery.

With Gihosoft Android Data Recovery, no longer afraid of data loss!

Must read:Youtube video downloader for pc

Gihosoft RePicvid Free Photo Recovery Software provides a free photo recovery software for windows to help users recover the deleted or lost photo for free.

Jihosoft Android Data Recovery: the best Android Data Recovery software for Windows and Mac to recover deleted contacts, messages, photos, videos, WhatsApp and etc from Android devices.Tips:How to transfer messages from iPhone to iPhone


jihosoft Free iPhone Data Recovery

2.26.2019

How to Disable In-App Purchases on iPhone/iPad?

How to Disable In-App Purchases on iPhone/iPad?

If you constantly use apps and enjoy extras or upgrades on iPhone/iPad/iPod, the ability to make purchases in the app itself is time-saving and much more convenient. However, that doesn’t mean that the capability to make in-app purchases doesn’t have its cons. Many iPhone and iPad users complain about unnoticed in-app purchases. While in-app purchases are convenient, they are often too easy to make, which could result in unnoticed and unintentional purchases. This article will explain how to view in-app purchases on an iPhone and how to disable these in-app purchases to ensure that you aren’t spending money accidentally.


Part 1: What is In-App Purchase on iPhone/iPad?


Part 2: How to Identify In-App Purchase on iTunes Account?


Part 3: How to Turn off In-App Purchase?


Part 4: How to Issue a Refund Request for In-App Purchase?


Part 5: Other Restriction Settings on iPhone/iPad
Part 1: What is In-App Purchase on iPhone/iPad?

If you have any Apple devices, you’re most likely familiar with the term “in-app purchase”. However, chances are that the only reason you know the term is from looking at your hefty iTunes bill. iPhone and iPad users have the option to use in-app purchasing which is exactly how it sounds- the ability to make purchases in an app. While this is a fantastic marketing technique and undoubtedly makes app developers loads of money, it can be incredibly frustrating how easy it is to make a purchase. You could be buying app extras without even knowing it until you see that iTunes bill! In-app purchase charges can add up quickly. Now that you know what in-app purchase is, let’s move on to discuss how to identify an in-app purchase on your iTunes account.


Part 2: How to Identify In-App Purchase on iTunes Account?

Now that you understand exactly what an in-app purchase is, you may be getting worried that you or your kids have accidentally made several in-app purchases yourself. So how do you find out if that’s the case? There are two ways that you can view in-app purchases on your iPhone. First, if you’re looking at an iTunes receipt that was emailed to you from the iTunes store, look at the “type column” and see if any of the charges have “in-app purchase” listed as their type. Second, if you’re logged onto your iTunes account in the iTunes store, you can check your purchase history and again, see if any charges listed in the “type column” are “in-app purchases.” Once you identify if you have any in-app purchase charges, you’ll be able to know exactly how much money was spent and on which apps.


Part 3: How to Turn off In-App Purchase?

If you find that the ability to make in-app purchases is more of a burden than a blessing, you might choose to turn off this feature- but then you’re stuck asking yourself how to disable in-app purchases on your iPhone. Thankfully, iOS has restrictions that can be enabled in order to stop you or your children from unknowingly making these in-app purchases and racking up a large bill.

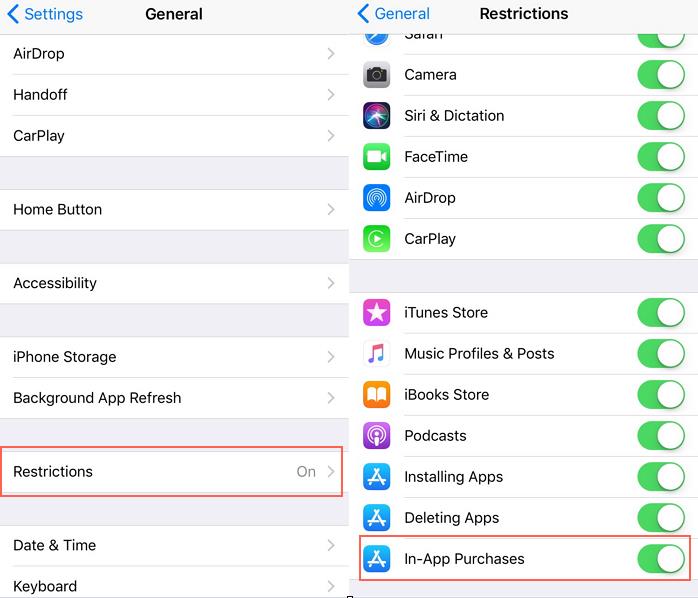
In order to disable in-app purchases, go to your iPhone’s home screen, go to settings>general>restrictions. You’ll be asked to choose a password, so make sure it’s one that you remember. Afterwards, switch the “in-app purchases” slider in the second set of options to the left. If you change your mind later on and would like to have the option of making in-app purchases, just switch the “in-app purchases” slider back.


Part 4: How to Issue a Refund Request for In-App Purchase?

So now you’ve checked your purchase history, confirmed that several suspicious charges were from in-app purchases and learned how to disable in-app purchases on your iPhone. But what happens with the charges you already racked up with accidental in-app purchases? You do have the option to request a refund for previous in-app purchases. This wasn’t always an option, as Apple has little way of knowing whether your purchases were made accidentally or you’re just looking for a refund from an impulse purchase. However, now the process to issue a refund is fairly simple. All you need to have is your order number and then you can follow the instructions on Apple’s website to request a refund. Although refunds aren’t guaranteed, you’re likely to get a refund if Apple doesn’t see a pattern of you making purchases and requesting refunds.
Part 5: Other Restriction Settings on iPhone/iPad

You can learn how to disable in-app purchases on your iPhone, which would prevent any accidental in-app purchases, but it also means that you couldn’t make any in-app purchases at all. There are other restriction settings on your Apple electronics that will help with this problem. First, you could choose to enable touch ID for any in-app purchases. This would prevent your children from making the purchases and would also prevent you from making any accidentally. There is also a rule in the iTunes store that you need to input your password before a purchase- however, after inputting your password, you have 15 minutes before they ask for it again, meaning you, or your children could make several purchases in that 15 minutes without a password required. You have the option to turn off this rule so that a password is required for every single in-app purchase.
Bottom Line

If you choose to disable in-app purchases on your iPhone, you could save yourself quite a bit of money. It’s dangerously easy to make in-app purchases without even knowing it or for your children to make in-app purchases on your iPhone when you aren’t looking. However, before choosing to learn how to turn off in-app purchases on your iPhone, be sure to learn what in-app purchases are and how to identify them on your iTunes account. There are also other restriction settings on your iPhone or iPad that could prevent you from making in-app purchases accidentally without taking off the option altogether. Remember that if you have made accidental purchases, you are able to request a refund on Apple’s website.Sponsor ads:ISO Mounter Free Software for Creating Virtual CD Drive
Also Read:Download the Latest Version of Samsung Kies for PC and Mac OS

Upload Backup to New iPhone 2019


1. Upload Backup to New iPhone via iCloud

The first way to do it is to restore your backup from iCloud. You can do this in just a few steps:

(1) You should be at the "Hello" screen when you first turn on your new phone. Make sure you're connected to Wi-Fi, then tap where it says Restore from iCloud Backup.

(2) Input your iCloud account credentials, then choose the iCloud backup you want to upload to new iPhone.

(3) Optionally, you can sign in with your Apple ID again to download your purchases. Either way, stay connected to the network and wait while your backup is restored. How long this takes depends on your network connection and other factors. If you have a particularly large backup, then it can take a while.
Sponsor ads:7 Best Twitch Streaming Software (Free and Paid) for You 2019


You may also like: How long does it take to restore from iCloud backup?

Disadvantages:

Naturally, there are a few disadvantages to this method. For one, you can't choose what you want to upload—you either upload the whole backup, or you upload nothing. You can't pick and choose data. Secondly, this only works if you have a backup saved in iCloud.
2. Upload Backup to New iPhone via iTunes

You can also restore your device from an iTunes backup. All you have to do is this:

(1) Go on the computer that has your iTunes backup and connect your device to it via the USB cable.

(2) Open up iTunes.

(3) Click on your device icon in iTunes, then on the summary page, click Restore Backup...Now simply wait for your backup to be restored by iTunes.


Alternatively, on the "Hello" screen, you can also tap Restore from iTunes Backup and follow the directions there. The steps will be similar, though. If you've made a previous backup on iTunes you can simply plug your device in and restore it.

Disadvantages:

This method also has some disadvantages. First of all, you can only upload the entire backup, just as with iCloud. You can't be selective about the data that you restore. Second of all, you need to have previously made an iTunes backup for it to work.
Also Read:Delete the Downloaded iOS Update on iPhone/iPad (iOS 12)


Sponsor ads:Fix Audio Issues on Windows 10 with 5 Methods that Work in 2019